Focus Drive Manual
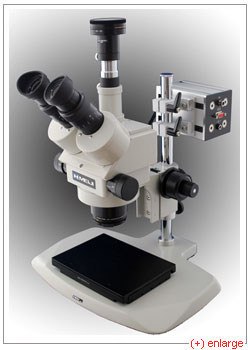
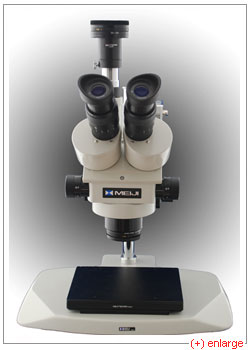
This page describes a microscope focus
drive, or z-stage, for a
Meiji
Techno EMZ stereo
microscope. The focus drive allows precise, computer-controlled,
vertical positioning of
the
microscope. This is useful when taking
photographs through a microscope.
This page guides you through making an enhanced depth-of-field
picture of a
10mm high object.
A separate page explains how to use the focus drive with Micro-Manager microscopy software.
Stereo Microscope
If you take a look through a stereo microscope, you immediately spot the difference between a stereo microscope and an ordinary, "biological" microscope. The image seen through an ordinary microscope is flat, as when looking a photograph. A stereo microscope shows a three-dimensional image. The image has depth, which allows you to manipulate tools under a stereo microscope; for instance to assemble products.
Magnification
What magnification should one expect from a stereo microscope? Stereo
microscopes have lower
magnification than normal
("biological")
microscopes. Stereo microscope magnification is generally between x2
and x100. An example may help. If you look at your wristwatch with
the naked eye, you
can
see the second hand move. If you look at your wristwatch using a stereo
microscope, you can see the minute hand move. Finally, the
magnification of a biological microscope would be sufficient to see the
hour
hand move.
Photography
The depth of
field of the microscope image is small -
a few millimeters at best, a fraction of a millimeter at worst,
depending upon the magnification used. This means that if you
takes a picture of a 10mm (approx. 0.5") tall object, typically either
the bottom or the top of the object will be in focus, but not both at
the same time.
To overcome this problem, many different pictures are taken, each
focused at a
slightly different height. These pictures are then joined into a single
picture with increased depth of field using stacking software
such as Helicon
Focus. A few sample pictures
show how this process may improve your pictures.
Taking a large number of pictures manually can be very time-consuming.
If you wish to automate taking these pictures, you need computer
control of both the camera and the microscope.
Tethered shooting
When taking photographs through a microscope, the camera is
usually connected to a PC. Using a PC to
control a camera is called tethered
shooting. The PC
screen is used as
viewfinder. Camera settings such as
focus, aperture and shutter time are adjusted on the computer, and
photographs are captured directly on the hard disk.
There is a vast choice in tethering software. PSRemote from Breeze Systems
is a good example.
PSRemote provides both a Windows and a command-line version. The
Windows version can be used interactively; while the
command-line version is more appropriate for batch scripts. Once the
tethering software is installed and configured, taking a
picture and saving it to disk becomes child's play:
C:\zstage>PSRemoteTest.exe

Success, image saved as: C:\PSRemote\2010-09-24\0001.JPG
Other camera models may need other software, but the basic idea is the same. You connect the camera to a computer and take pictures under software control.
Focus Drive
Installing
We need to connect the focus drive to the computer, and install the
focus drive software.
Connect the focus drive to a PC serial port
or a USB-to-serial adapter.
Connect the focus drive to the 24V power supply.
Download and install
the
command-line
utilities for Windows from the Downloads
section at
the bottom of the page.
Using
A focus drive allows the computer to change the vertical position of the microscope. The command-line utility zstage.exe is used to move the focus drive. zstage.exe takes two parameters: the serial port the focus drive is connected to, and the distance the focus drive has to move. The output of zstage.exe is the current position of the focus drive. An example: the focus drive is connected to port COM3, and we wish to know its current position:
C:\zstage>zstage.exe COM3 0

.

position 0
C:\zstage>
The focus drive reports back its current position as 0.
Now let's move the microscope. Distance is specified as number of steps
* 256. One step equals
19.25µm. Let's try to move the microscope one
step
down:
C:\zstage>zstage.exe COM3 256

.

position 256
The focus drive reports back its current position as 256. If we move one more step down, position will be 512:
C:\zstage>zstage.exe COM3 256

.

position 512
Let's go back to the origin:
C:\zstage>zstage.exe COM3 -512

.

position 0


C:\zstage>
Drive behavior can be summarized as follows:
- The z-axis is pointing down. Negative movement is up, positive movement is down.
- If you specify a distance which is a multiple of 256, the drive will execute steps of 19.25µm.
- If you specify a distance which is not a multiple of 256, but which is a multiple of 16, the drive will execute micro-steps of 1.2µm (=1/16th step).
- If you specify a distance which is not a multiple of 16, the drive will move to the nearest microstep.
Microstepping improves resolution at the cost of decreased repeatability. For most applications, microstepping is not needed. In most cases, specifying distances which are a multiple of 256 will provide the best results.
Depth of field
How many pictures do you need to take? How much should the
microscope
move between pictures? A bit of experimenting usually is needed, and a
bit of experience helps, but where do you begin?
As a first guess of how
many pictures will be needed to show an object in focus, look
up the depth of field in the table "Depth of
Field of the EMZ5".
Set the
vertical distance between two pictures to half the depth of field,
rounding
down. Set the number of pictures to the height of the object divided by
the vertical distance between pictures, rounding up.
Example:
Question: As a rough guess, how many pictures are needed for a 5mm high object, with the Meiji Techno EMZ-5 at 2x zoom, and without auxiliary lens? The focus drive has a vertical movement of 19.25µ per step.
| Object height: | 5 mm | (measured) |
| Depth of field: | 0.391mm | (look up in EMZ5 table) |
| Vertical distance between pictures, in mm: | 0.391mm/2 = 0.196mm | (depth of field/2) |
| Focus drive step size: | 0.01925mm/step | (from focus drive documentation) |
| Vertical distance between pictures, in steps: | 0.196mm/0.01925mm/step = 10.18steps | |
| Rounding down: | 10 steps = 0.1925mm between pictures | |
| Number of pictures: | 5mm/0.1925mm = 26.0 pictures | (object height/vertical distance between pictures) |
| Rounding up: | 27 pictures |
Answer: 27 pictures, moving the microscope 0.1925mm = 10 focus drive
steps between pictures. This corresponds to a 'distance' parameter of
10 * 256 = 2560 for zstage.exe. Assuming the focus drive
is connected to
COM3, the following command will be used to move the stage:
zstage.exe COM3 2560
Taking the pictures
We now combine everything in a batch script.
| number of pictures: | 27 |
| command to take a picture: | PSRemoteTest.exe |
| vertical distance between two pictures: | 2560 |
| command to move the stage: | zstage.exe COM3 2560 |
We are now ready to take the pictures. Manually focus the microscope to the bottom of the object. Executing the batch file zstagerun produces this sample output. During execution of the script, a total of 27 pictures are saved in C:\PSRemote. Check the pictures are OK. If the color of the pictures is off, verify the color temperature setting of the camera corresponds to the light source you're using. All pictures of the stack should be as similar as possible. If autofocus or auto-exposure causes variation between pictures, you may have to use manual focus and/or manual exposure.
Z-Stacking
The pictures can now be processed with stacking software
such as Helicon
Focus . This is an operation which requires a fair bit of computing
power. The end result is a single image with extended depth of
field.
At this point you may wish to experiment. Can you take less pictures
and
still have the same image quality? Does increasing the number of
pictures improve image? Changing the parameters in
the zstagerun
batch file provides the
answers to these questions in minutes.
Resolution and depth-of-field of the Meiji Techno EMZ-5
| Zoom Magnification | N.A. | Resolution power | ||||
|---|---|---|---|---|---|---|
| Standard | With Auxiliary 0.5X | With Auxiliary 0.75X | With Auxiliary 1.5X | With Auxiliary 2.0X | ||
| 0.7X | 0.027 | 12.4µ | 24.9µ | 16.6µ | 8.3µ | 6.2µ |
| 1X | 0.039 | 8.6µ | 17.2µ | 11.5µ | 5.7µ | 4.3µ |
| 2X | 0.056 | 6.0µ | 12.0µ | 8.0µ | 4.0µ | 3.0µ |
| 3X | 0.064 | 5.2µ | 10.5µ | 7.0µ | 3.5µ | 2.6µ |
| 4X | 0.067 | 5.0µ | 10.0µ | 6.7µ | 3.3µ | 2.5µ |
| 4.5X | 0.07 | 4.8µ | 9.6µ | 6.4µ | 3.2µ | 2.4µ |
| Zoom
Magnification |
Depth of
Field in millimeter (mm) with SWF10X |
||||
|---|---|---|---|---|---|
| Standard | With Auxiliary 0.5X | With Auxiliary 0.75X | With Auxiliary 1.5X | With Auxiliary 2.0X | |
| 0.7X | 2.176 | 5.107 | 3.069 | 1.367 | 0.994 |
| 1X | 1.053 | 2.467 | 1.484 | 0.662 | 0.481 |
| 2X | 0.391 | 0.958 | 0.561 | 0.241 | 0.174 |
| 3X | 0.244 | 0.623 | 0.355 | 0.148 | 0.105 |
| 4X | 0.188 | 0.499 | 0.278 | 0.112 | 0.079 |
| 4.5X | 0.164 | 0.44 | 0.244 | 0.097 | 0.068 |
Vertical Resolution of the Focus Drive
Used with the Meiji Techno FC ("Fine/Coarse") focus block the focus
drive has the following mechanical resolution:- 19.25 ± 0.1µm/step
- 16 microsteps per step, 1.2µm/microstep
Connectors
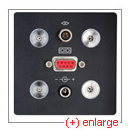
The front panel of the focus drive has three connectors: power, data
and the optional joystick.
Bottom: Power
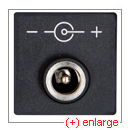
24V DC@0.5A, center pin positive. Do not exceed 30V. Do not apply reverse polarity.
Middle: Data
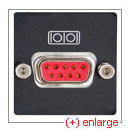
Serial data, 9600 8N1.
| Signal | Pin |
|---|---|
| TxD | 2 |
| RxD | 3 |
| Gnd | 7 |
Top: Joystick
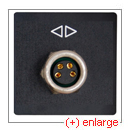
Connects optional joystick for standalone use. Always unplug the power connector before connecting or disconnecting the joystick.
| Signal | Pin |
|---|---|
| +5V | 1 |
| Digital out (GPO) | 2 |
| Analogue in (GPI) | 3 |
| Gnd | 4 |
Links
Focus Drive
Tethering Software
- Breeze Systems software for Canon and Nikon.
- Adobe Photoshop Lightroom supports many camera models, both on Windows and Mac.
Focus Stacking Software
- Helicon Focus Commercial, Windows and Mac.
- CombineZP Freeware, Windows only.
Microscopy
- Introduction to Stereomicroscopy General literature about (stereo)microscopy.
- The Clean Microscope, Dr. Michael Zölffel, Carl Zeiss MicroImaging. How to recognize and remove dirt from your microscope.
- How many pixels does a microscope camera need? Materials MicroImaging Newsletter 10/07, Carl Zeiss MicroImaging.
Back to Focus Drive
